Asset Cache Control
In this tutorial, we’ll look at various ways you can manage caching of the static assets you serve from your Treepl website, both while developing and after the site has gone live.
Static assets, such as CSS files, JS files and images are usually stored in some sort of cache, both at the server level and in the users’ browsers.
While this behaviour is critical for site performance it can also get in the way of displaying the latest changes on your site, since the old versions are being loaded from cache. This is particularly true while developing your site, where frequent changes are being made and you and your client are trying to review those changes. But it can also be an issue after the site has launched and an update to your CSS or JS files needs to be rolled out.
Below are some typical situations where caching issues like this can occur and some methods on how to manage them.
The Problem
When a user views your site, their browser will likely store a copy of any downloaded assets, such as CSS, JS and image files, in the browser’s cache (stored on the user’s device).
If you later update those assets on the website server and the user views your site again, the browser will likely display those cached assets instead of your updated files. At least for a predetermined amount of time.
You can clear your own browser cache, or ask that your client clears theirs, but this is far from ideal and obviously, we can’t control what other users do, or don’t do, with their browser cache.
Another way to force the updated file/s to be downloaded afresh on the user’s end is by changing the file name. As this will effectively be a new file the browser hasn’t seen before. However, changing file names of your assets is also not very convenient. Luckily, we can also ‘trick’ the browser into seeing our existing assets files as new simply by adding GET/URL parameters to the file path, like this:
<link rel="stylesheet" href="/css/main.css?myparam=1">
If you update the file again and want to ensure all users see the new changes, you’d then update the parameter with a new value:
<link rel="stylesheet" href="/css/main.css?myparam=2">
This method provides individual ‘cache-busting’ control for each of your assets, but it can still be cumbersome to include into your workflow, especially if you have many referenced files and several locations where the code resides.
Using Liquid and the Site Globals feature of Treepl CMS we can make this process much easier and more manageable.
The Solution
Using the URL parameter method described above, we can employ the power of Treepl CMS to make this task easier for us.
Now, forcing the browser to download new assets isn’t something we want to be doing all the time or on a large scale, due to performance issues. So we want to separate the times when we might be doing this into two periods. One; while your site is in development, and two; while your site is live.
During development, when you’re likely making many changes to your site assets on a regular basis, it’s acceptable to basically disable the caching of these files completely - so that you can be sure you’re always viewing the most up-to-date files and can eliminate browser caching issues during any site troubleshooting.
After development is finished and your site is live, static asset changes will likely be greatly reduced and we want to utilise caching for all its benefits.
So, armed with this mindset, let’s get into the solution.
First, we’ll use the Site Globals feature to set up a “Development” group along with 3 properties, as illustrated below:
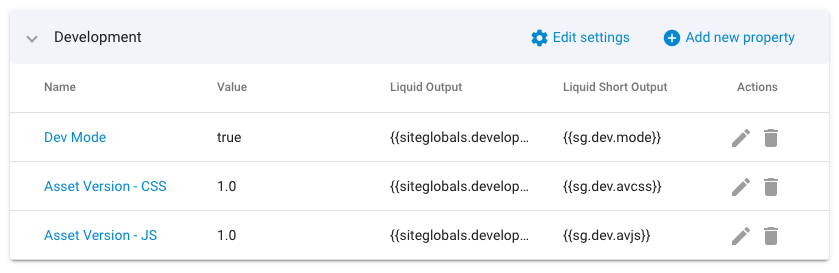
Just be sure your properties have the same ‘Liquid Short Output’ tags.
true (default)falsesg.dev.mode1.0sg.dev.avcss1.0sg.dev.avjsThe “Dev Mode” property is set to true by default and is used to indicate your site is in a development phase (our Liquid code will use this later). Once you go live, you’d update this property with the value of false.
The “Asset Version - ...” properties allow you to specify a new value for the URL parameter method (as described above) and here we’ve separated this versioning between your CSS and JS files since we typically wouldn’t need to recache both asset types at the same time. So this provides some granular control without getting too hard to maintain.
Wherever you finish your changes to your assets files and want to push out the new version, you’d edit the relevant values here to update your version numbering - and you can use whatever numbering system you like here (so long as the characters used are safe for a URL string).
You could set up additional properties to further control different asset groups as you see fit. Just be sure to add them to the Liquid code below too.
Next, you’ll need to add the following Liquid code to the very top of your <head> element - or at least above any asset references that you’ll be using this technique with. Typically, this will be done in your Content Templates or a <head> snippet or include file.
{% if sg.dev.mode == true %}
{% assign AssetVerCSS = "now" | date: "%s" %}
{% assign AssetVerJS = "now" | date: "%s" %}
{% else %}
{% assign AssetVerCSS = sg.dev.avcss %}
{% assign AssetVerJS = sg.dev.avjs %}
{% endif %}
This code works by checking the condition of your “Dev Mode” set in your Site Globals.
If the site is in development mode, the two URL parameter values (for CSS and JS files) will be stored in Liquid assign variables as a date stamp that changes every second - effectively forcing the file to be downloaded afresh upon every page load.
If the site is not in development mode (live), the two URL parameter values will be stored in Liquid assign variables as per those defined in your Site Globals.
Now, you just need to apply these Liquid variables in a URL parameter string on any of your static assets references, for example:
// Add ?ver={{AssetVerCSS}} to your asset references
// CSS
<link rel="stylesheet" href="/css/main.css?ver={{AssetVerCSS}}">
<link rel="stylesheet" href="/css/custom.min.css?ver={{AssetVerCSS}}">
//JS
<script src="/js/jquery.js?ver={{AssetVerJS}}"></script>
<script src="/js/main.js?ver={{AssetVerJS}}"></script>
That’s it.
From now on, you only need to adjust your Site Gloabls to manage static asset caching issues.
Image Caching
While image caching can fall under the same situation as the above static asset caching and can be solved with the same URL parameter methods, it’s a lot more maintenance to apply the URL parameters to all your site images like described above. Instead, it’s usually more appropriate to either change the image file name or manually add a unique URL parameter to the image file path on an individual basis as needed.
Image Processor
For images where you are using the ImageProcessor parameters, you can also add your own parameters for versioning purposes. Or, if you want to refresh the cache for all site images that use ImageProcessor functions, you can use the “Empty Image Cache” in the gear icon () in the top right of the admin.
External Resources
There are currently no external resources available.
Please let us know if you have any other contributions or know of any helpful resources you'd like to see added here.
Questions?
We are always happy to help with any questions you may have.
Visit the Treepl Forum for community support and to search previously asked questions or send us a message at support@treepl.co and we will consult you as soon as possible.