Advanced CRM Groups
Advanced CRM Groups allow you to extend the data fields within multiple areas of the CRM, either globally or on a per-record basis.
Extending the CRM with your own custom fields can be done in the following CRM areas:
Contacts
Orders
Form Submissions
Booking Subscriptions
Opening up the CRM in this way is great for building your customer data schema for your particular needs, tailoring the CRM to your requirements and making it more functional.
Some examples could be; Adding additional contact information for all contact records, like a secondary phone number or email address, or extending company information such as business/licence numbers and postal/physical addresses. Or you could extend data collected and assigned to each customer’s Orders, such as delivery instructions or special notes needing to be saved against each individual purchase.
Managing Groups
From the Advanced CRM Group list view, click the “ADD NEW GROUP” button at the top to start creating a new group or click directly on the name of any existing group in the list.
You can also duplicate a group via the duplicate icon (), or delete a group via the trash can icon () to the right of the group name in the list.
Group Settings and Fields
Upon creating/editing a CRM Group you’ll have access to the following options.
Select the areas of the CRM you’d like to assign this group of fields to by default, and for all of it’s items (both existing and newly created). For example, assigning the group to ‘Contacts’ and ‘Form Submission’ would mean all Contact records would automatically include the groups fields as part of the record and likewise all Form Submission entries would have the fields available for editing as well.
You can still apply Advanced CRM Groups to any CRM area on an individual, ad-hoc basis if you don’t wish to apply the fields to ALL items (when editing such items, look for the ‘+ Add custom fields’ button to singularly apply CRM Groups).
You can then add custom field types to your Group by clicking the '+ Add new field' button.
These new properties will then be available for you to save data against and to sort/filter by on the website front-end.
Give your new field a relevant name. This name will be displayed against the relevant CRM item in the admin as well as being part of the data handle in which to render the field’s value on the front-end website (if required).
The field Type allows you to select the appropriate input type for your data requirements.
When creating a field, the ‘Required field’ checkbox allows you to set the field as required when an item is being created via the admin AND via the website front-end if added to a form.
Be sure to save the field to apply it to your Group as well as to save the overall Group to apply all changes.
The various field types available are listed below:
stringAlthough, may want to use a standard date format (such as ISO 8601) or implement a date picker plugin to correctly format a date so you can better use that data later in your code.
comma-separated listcomma-separated listcomma-separated listcomma-separated liststringstringtrue/falseon'.pathIf using the Upload field type you must add enctype='multipart/form-data' as an attribute to your form element.
/_form_submissions/<form_id>/<submission_id>/<file_name>-<dateStamp><.ext> The multiple parameter is currently not supported for file type inputs. To add multiple file upload fields to your form you will need to add additional upload fields in the Form Builder and insert the corresponding HTML into your form layout.
Working With CRM Group Data
You can add, edit and output Advanced CRM Group data in a variety of ways, including manually via the admin, importing and exporting, collection via form submissions and output via Liquid components.
Export
If CRM Groups are applied to the CRM item (Contacts, Events, Orders...) you’ll be able to export the data from the CRM item’s list view via the standard ‘Export’ function, found under the auxiliary menu () at the top of the list view page.
Import
You can import data to the CRM Group fields in two ways:
- If you’ve applied the CRM Group/s to a CRM area (ie: Contacts) the Group’s fields will automatically become part of the export template and export file for that area. Therefore, you can use that export template when formatting your data for import.
- If the CRM Group is not applied to the CRM area you wish to import to, you can still do so by generating an import template via the ‘Get Import Template’ option and select the ‘Advanced CRM Group’ required for the import. This will include the relevant fields in the import file.
Front-End Updating
Collecting data to your Advanced CRM Group fields can be done from the front-end website via forms.
Update Account Form
If you’re allowing users to update their account information, via a secure zone, you can use the ‘Update Account Form’ (found in the Component manager: ‘Secure Zone’ > ‘Update Account Form’) which will automatically include input fields for all CRM Groups that are globally assigned to Contact records.
For CRM Group fields not globally assigned to Contacts, you can add the input fields to the form code manually, configuring the input names as described below.
Other Forms
When building Forms, whether for general enquiries, payments, Event registrations or shopping cart checkouts, you will have the ability to add CRM Group fields (found under the ‘Default user fields’ in the form builder).
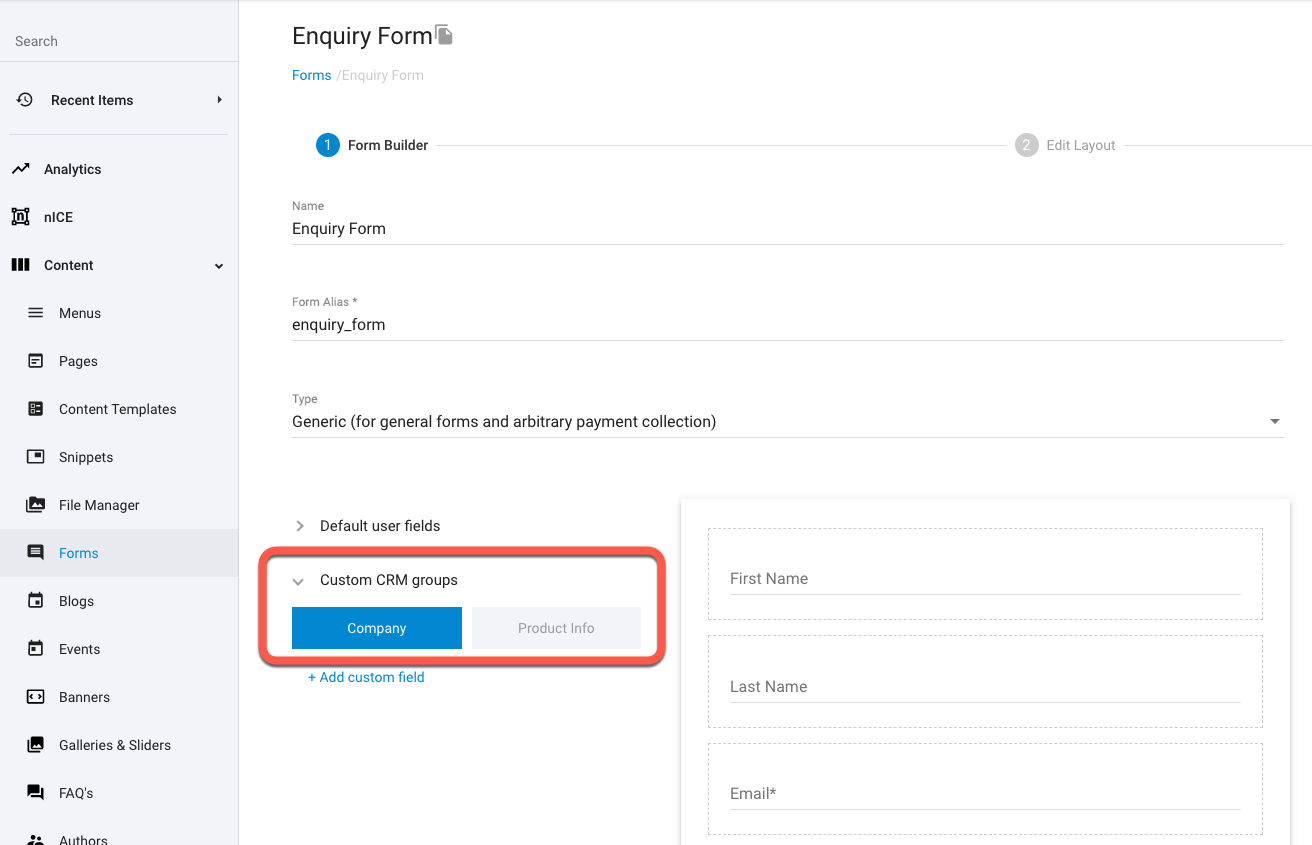
Select the CRM Group/s required and arrange them in the form builder as needed.
In the ‘Edit Layout’ step you’ll be able to add the CRM Group fields to your form code using the “ Form Fields” button at the top right of the editor window, or by restoring the form layout to default (be careful not to lose any form customisations already made).
Alternatively, you can construct the CRM Group field inputs manually, configuring their name attributes with the naming convention ‘groupalias_FieldName’, based on your CRM Group name and field names. For example, if you had a CRM Group called “Company Details” with a field called “Licence Number”, the form input element could be constructed like so:
<input type="text" name="companydetails_LicenceNumber">
When adding Advanced CRM Group fields to a form, the collected data will be applied to the Form Submission (Case) by default, unless the CRM Group fields have been applied to the CRM area globally - in which case, the collected data will then be added to the corresponding CRM area (ie: Contact record, Event Booking, Order...)
Front-End Outputting
See Advance CRM Group component documentation for details on outputting Custom CRM Group data.
Related Articles
- CRM
Contacts
Contacts store individual’s contact details and other customer-specific data (including extended custom fields) that is either collected via the website, manually added via the admin, or created via external API connections. - OpenAPI (Admin)
CRM Contacts API
Create, Retrieve, Update and Delete CRM Contacts via the public API endpoint using "where" filtering as well as retrieve a contact's Bookings, Cases and Orders. The contact's Secure Zone details can also be retrieved and password reset via this API. - Reports
Custom Reports
Custom reports can be used to bring CRM data together, as a spreadsheet, based on your requirements. - OpenAPI (Admin)
Customer Types API
Retrieve Customer Types via the public API endpoint. - CRM
Form Submissions
Form Submissions store the captured data from any form submission made on your website (from a form created under ‘Content’ > ‘Forms’). - CRM
Event Bookings
Event Bookings store all registrations made to an Event item, either via the website front-end or manually allocated via the admin. - CRM
Orders
Orders store accounts of any payments made via the website and provide management for additional payments, invoices, order statuses, tracking info, the products purchased within the order and the details of the form submission used to take the order. - Liquid Components
CRMContacts
This component fetches CRM Record data to use on the front-end via Liquid. - Liquid Components
CRMCustomGroup
This component fetches Advanced CRM Group data attached to CRM Records, Cases, Orders or Event Bookings. - Liquid Components
member_update_form
This component renders a contact update form for a specified CRM contact so that a CRM Admin role, who is logged in to the front-end, can update the specified contact’s CRM info or secure zone subscriptions.
External Resources
There are currently no external resources available.
Please let us know if you have any other contributions or know of any helpful resources you'd like to see added here.
Questions?
We are always happy to help with any questions you may have.
Visit the Treepl Forum for community support and to search previously asked questions or send us a message at support@treepl.co and we will consult you as soon as possible.