On-Site Editor (OSE) PRO
The On-Site Editor allows admin users to manage designated content from the front-end of the website in a more streamlined and intuitive manner.
Managing content via the OSE provides a simplified editing experience, removing the clutter of the admin environment and focusing only on the content modules and specific properties that have been designated for the OSE. This provides a high level of control for the content you allow to be edited via the OSE.
Supported Content Types for OSE
The On-Site Editor is compatible with, and can be individually enabled for, the following content types and modules:
- Site Globals (per group)
- Pages (Page Folders and Pages)
- Blogs (Blogs and Posts)
- Events (Groups and Items)
- Banners (Groups and Items)
- Galleries/Sliders (Groups and Items)
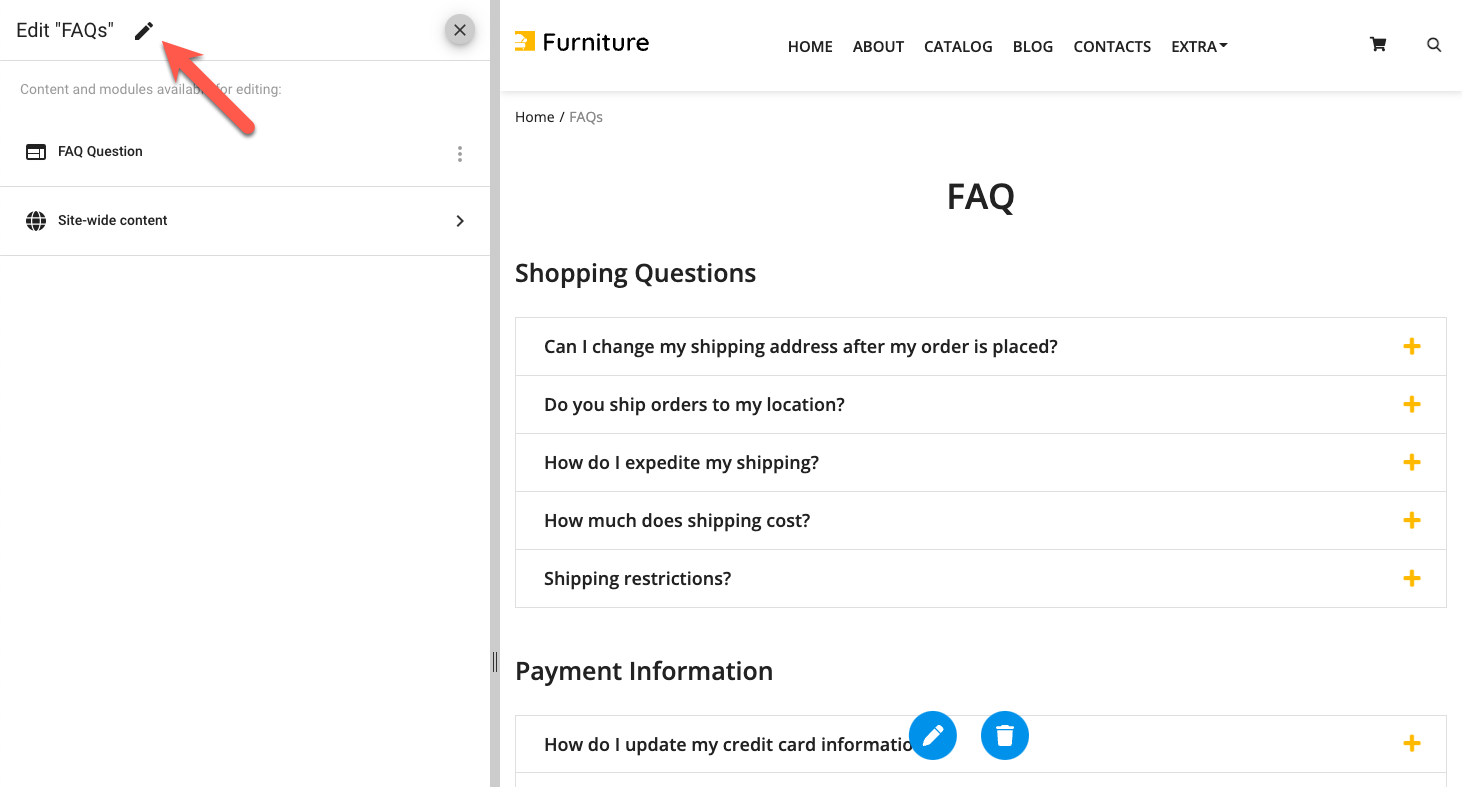
- FAQs (Groups and Items)
- Authors
- Products/Catalogs
- Custom Modules
Enabling OSE
The OSE PRO is available as a site extension and can therefore be enabled from your reseller Portal, via the site instance settings, under the ‘Extensions’ tab.
Installing the extension to your site will enable the below options for further configuration.
Site Globals
You can enable any Site Globals groups to be accessible via the OSE by checking the “Enable On-Site Editor” checkbox in the group settings.

Once enabled, the properties within the enabled groups will display as editable fields in the OSE sidebar when viewing any page of the website.
Content Modules
By default, there are no content modules enabled for the On-Site Editor. Each module must be configured as needed to allow OSE access.
1 Enable Module Properties
In the modules settings (under the “ EDIT SETTINGS” option on the modules home screen), navigate to “On-Site Editor Settings”. Move, from left to right, the desired properties (data fields) to make them available for the OSE interface.
2 Admin User Roles
Ensure that the module has the appropriate permissions enabled in the Admin User Role/s for those admins that will be using the OSE functionality.
3 Define Module Item Wrappers
Data attributes will need to be added to the HTML wrappers/list item layouts to allow the OSE to detect where to allow editing capabilities.
The HTML element that wraps each item (in your ‘List’ and/or ‘Detail’ layouts) should include the following data attribute:
data-cms_ose_item_id="{{this['Id']}}"
For example, in your list/detail layout:
<div data-cms_ose_item_id="{{this['Id']}}">
    <!-- YOUR LAYOUT CONTENT -->
</div>
(since we are working in the module’s layout we can use Liquid to populate the item’s ID for this data attribute)
4 Include Editor Buttons
To interact with the enabled items some buttons need to be added to the layout so we can initiate editing when in OSE mode.
There is no pre-defined, default layout for these buttons. You are free to include these in any way that suits your requirements.
There are three buttons available, one for editing the item, one for adding a new item, and one for deleting the item. Only the Edit button is required.
To configure an element (in the item’s layout) to be used as one of these buttons, add either of the following data attributes:
Edit button:
data-cms_ose_edit_item_button="{{this['Id']}}"
Delete button:
data-cms_ose_delete_item_button="{{this['Id']}}"
Example code:
<button data-cms_ose_edit_item_button="{{this['Id']}}">Edit</button>
<button data-cms_ose_delete_item_button="{{this['Id']}}">Delete</button>
If you do not wish to allow item deletion you can omit including the delete button in the item’s layout.
The ‘Enable’ property can be included as an editable field, so you may prefer to encourage admin’s to disable items rather than delete them.
Add New Item button:
data-cms_ose_add_new_item_button="1234"
The 'Add New Item' button would typically be added to the wrapper of your module’s listed items (outside of the list layout) since you would likely only want one 'Add' button for the whole list. Therefore, the Module ID would need to be hardcoded (see below for options to dynamically add the Module ID).
However, the 'Add New Item' button can be added to the list layout and display for every item if desired.
Example code:
<button data-cms_ose_add_new_item_button="1234">Add</button>
Where 1234 is the ID of the module the item's belong to.
If your 'Add New Item' button code is being added into your module layouts, or has access to the module's Liquid (ie: in a layout using object: "collection" or within a collection's for loop), you can also dynamically render the Moduel ID with liquid, for example:
<button data-cms_ose_add_new_item_button="{{this['Module_ID']}}">Add</button>
Since the implementation of these buttons is up to you, if simply added to your layout they will also be visible for public viewers outside of the On-Site Editor.
Two possible suggestions for handling this and hiding/removing the buttons when not in the OSE mode are as follows:
Hide Buttons with CSS
When in OSE mode a class of cms_ose_activated is applied to your website’s <body> element. Therefore, you can target the buttons when the OSE is not activated and hide them with CSS styles, like so:
body:not(.cms_ose_activated) [data-cms_ose_delete_item_button],
body:not(.cms_ose_activated) [data-cms_ose_edit_item_button],
body:not(.cms_ose_activated) [data-cms_ose_add_new_item_button] {
    display: none !important;
}
Render Buttons with Liquid
The page URL used when in OSE mode will always contain a URL parameter of enableOSEAdmin=true. Therefore, you can use a Liquid condition to render the buttons only if this URL parameter is present, like so:
{% if request.request_url.params.enableOSEAdmin %}
    <button data-cms_ose_add_new_item_button="{{this['Module_ID']}}">Add</button>
    <button data-cms_ose_edit_item_button="{{this['Id']}}">Edit</button>
    <button data-cms_ose_delete_item_button="{{this['Id']}}">Delete</button>
{% endif %}
Automatically Added Attributes
The list item's parent HTML element (usually the wrapper for the module layout) will also automatically have the following data attribute added (you do not need to add this manually):
data-cms_ose_module_id="{{this['Module_ID']}}"
For example:
<div data-cms_ose_module_id="{{this['Module_ID']}}">
    {% component source: "My Module", layout: "List", type: "module" %}
</div>
This data attribute allows the module to be listed in the OSE sidebar and to track and display any item drafts pending publishing.
Other Attributes
Additionally, there are optional data attributes that can be added to your markup to further control how OSE Pro works for specific content regions
data-cms_ose_reload_page="true"
When added to the item’s wrapper, it forces the OSE to reload the page after any edits are made.
Why might you use this attribute?
By default, the OSE uses AJAX to dynamically update the edited items directly on the page, without needing to reload the whole page (as a page reload can be detrimental to the admin user’s experience - particularly on slower connections and/or heavy site pages).
However, if an edited item contains other dynamically controlled content or DOM manipulations - such as with many javascript/jQuery plugins, like image sliders and other interactive elements - those plugins can often break with the AJAX reload and that particular site content can become unusable or no longer as easily editable.
Forcing the OSE to reload the page allows the javascript/jQuery to reinitiate the plugins and load the page correctly.
If you are experiencing this issue with your modules, but a forced page reload is not desirable, there is another option to listen for a javascript event which will fire after any edit is made. For further details see the section below “Javascript Events”.
data-cms_ose_editable_text
Use this data attribute to separate, or isolate, blocks of content within the system Content field or any custom WYSIWYG property. Transforming the single WYSIWYG property into multiple WYSIWYG editable fields - within the OSE Pro interface.
This is helpful in protecting extra markup or code blocks that are present in a WYSIWYG field and that you want to lock down from admins. Reducing the risk of corrupted markup as a result of edits via the WYSIWYG.
This data attribute will only work for custom properties of type 'Text (Multiline)' with only the 'WYSIWYG' option enabled. If 'Code Editor' is enable on the property as well, the OSE will not seperate the text blocks and it will remain as one single editable Code/WYSIWYG field.
For example:
Below we have the contents of a WYSIWYG field with markup for a 2 column grid and we want to avoid the admin interfering with the grid markup while still having full control over the text in both columns:
<div class="row-holder">
    <div class="col-6">
        <p>Lorem ipsum dolor sit amet, consectetur adipiscing elit, sed do eiusmod tempor incididunt ut labore et dolore magna aliqua.</p>
    </div>
    <div class="col-6">
        <p>Lorem ipsum dolor sit amet, consectetur adipiscing elit, sed do eiusmod tempor incididunt ut labore et dolore magna aliqua.</p>
    </div>
</div>
So, we can wrap the 2 column's content with the data attribute to split it into 2 separate editable regions when using the OSE Pro edit mode.
<div class="row-holder">
    <div class="col-6">
        <div data-cms_ose_editable_text>
            <p>Lorem ipsum dolor sit amet, consectetur adipiscing elit, sed do eiusmod tempor incididunt ut labore et dolore magna aliqua.</p>
        </div>
    </div>
    <div class="col-6">
        <div data-cms_ose_editable_text>
            <p>Lorem ipsum dolor sit amet, consectetur adipiscing elit, sed do eiusmod tempor incididunt ut labore et dolore magna aliqua.</p>
        </div>
    </div>
</div>
The resulting OSE Pro interface:
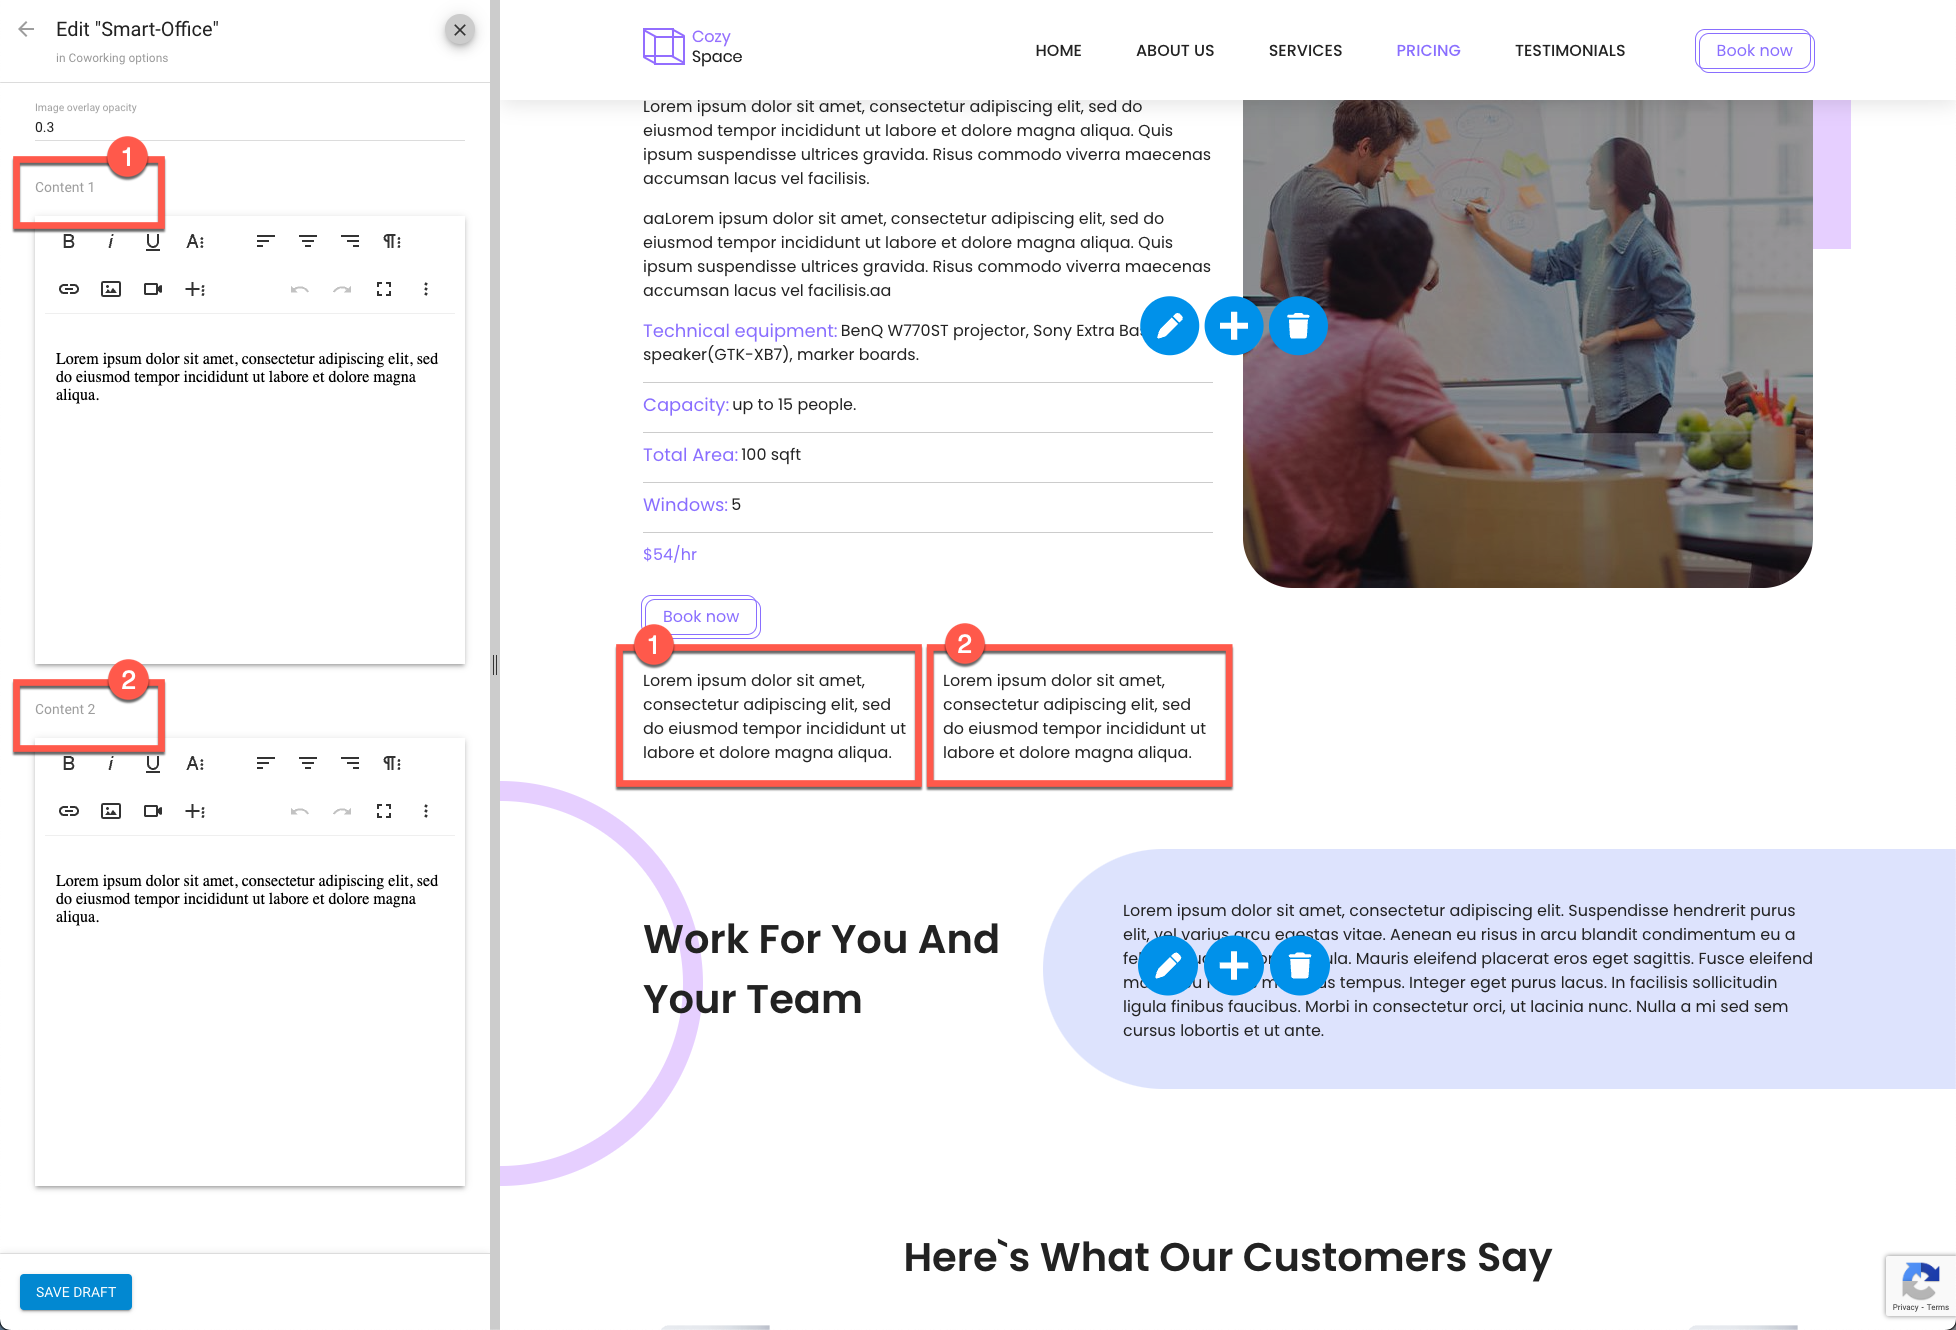
The field labels in the OSE Pro sidebar will be automatically created based on the property name appended with the section index, eg:
Content 1
Content 2
etc.
You can customise these labels using the following data attribute…
data-cms_ose_editable_text_title
When using the previous data attribute, to split a content block into multiple editable regions, you can optionally customise the field label used to describe these new blocks in the OSE Pro sidebar interface.
Expanding on our previous example above, now with custom field labels defined via the additional data attribute:
<div class="row-holder">
    <div class="col-6">
        <div data-cms_ose_editable_text data-cms_ose_editable_text_title="Main Column One">
            <p>Lorem ipsum dolor sit amet, consectetur adipiscing elit, sed do eiusmod tempor incididunt ut labore et dolore magna aliqua.</p>
        </div>
    </div>
    <div class="col-6">
        <div data-cms_ose_editable_text data-cms_ose_editable_text_title="Main Column Two">
            <p>Lorem ipsum dolor sit amet, consectetur adipiscing elit, sed do eiusmod tempor incididunt ut labore et dolore magna aliqua.</p>
        </div>
    </div>
</div>
The resulting OSE Pro interface:

Editing Pages with OSE
General site Pages can also be edited with the OSE by following the steps above.
However, since you will typically be on the Page during OSE mode (which will be its detail layout) you will need to ensure your edit buttons are on the detail layout for Pages.
This is the same for any module where you want to enable editing on its detail view.
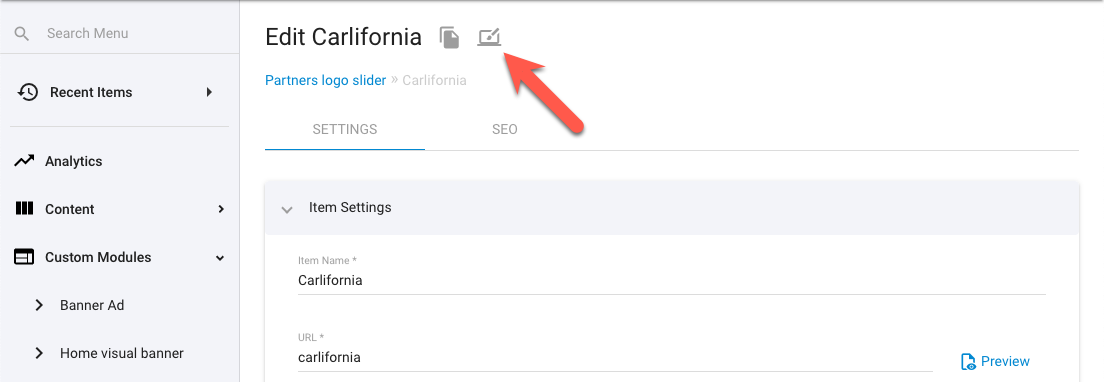
When on the Page (or any detail view) and an edit button has been included in the detail layout, you will see the pencil icon () next to the page title in the OSE sidebar.
Using OSE (Front-end)
With your modules configured you are now ready to access the On-Site Editor mode and start editing content directly from the front-end.
There are several ways to access the OSE.
Firstly, if the admin user is configured as an OSE admin only, they can simply access the editor by appending ‘/edit’ to your websites domain name (or trial site/system URL), for example:
https://www.mydomain.com/edit
Or
https://my-site.trialsite.co/edit
If the admin user has access to the admin, there will be a link directly to the OSE mode at the bottom of the admin’s main navigation on the left hand side.

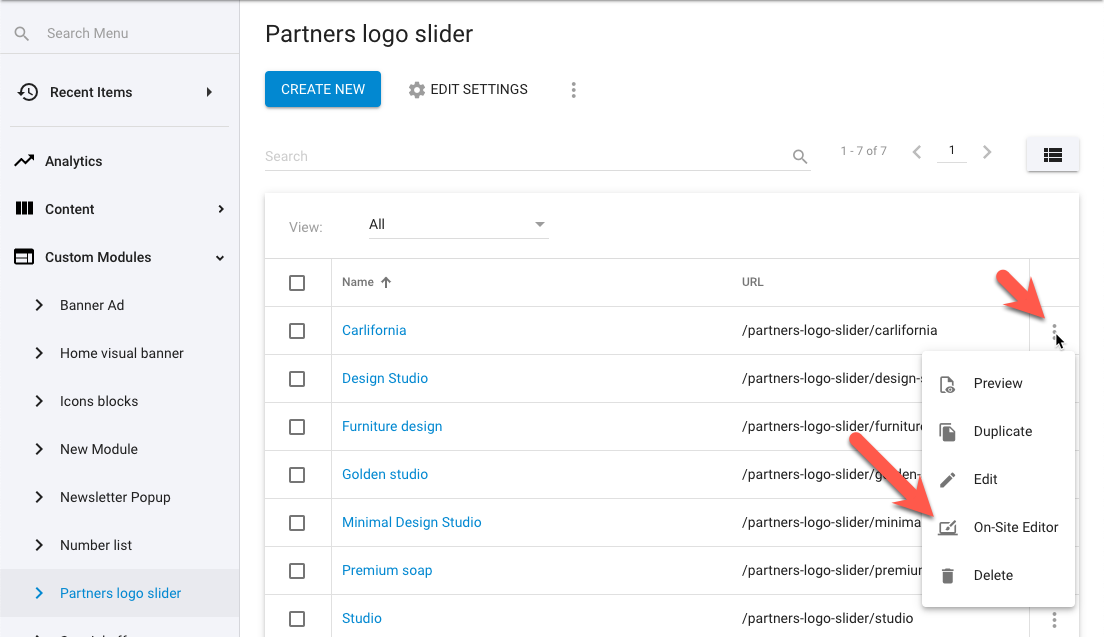
Additionally, module items will provide On-Site Editor links, to their detail pages, both from the 3 dot () contextual menu in the module list view:
And when on the edit page of an item, the OSE icon () at the top of the screen:
Site Globals
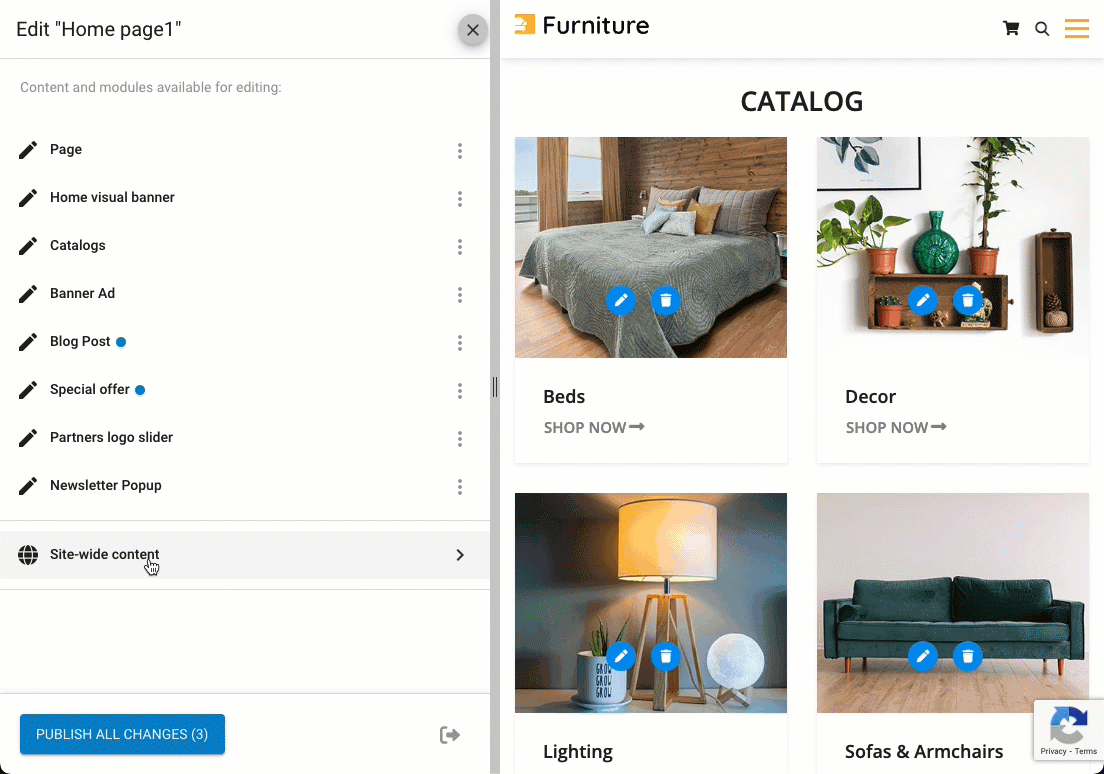
When in the On-Site Editor mode, the editing sidebar will display to the left of your website.
Any enabled Site Globals groups will display in this sidebar under the “Site-wide content” heading.
Clicking into the group name will present all the group’s fields for editing.
Use the ‘Save’ button at the bottom of the sidebar to apply any changes.
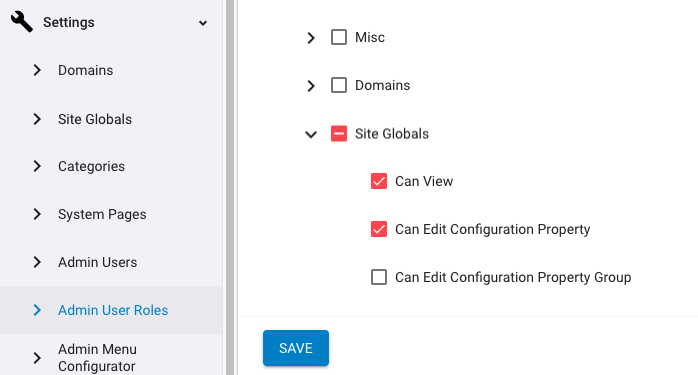
Admin User Roles
Ensure the following permissions are enabled in the Admin User Role/s for those admins that will be using the OSE functionality for editing the Site Globals.
Enable permissions: “Can View” and “Can Edit Configuration Property”.
Available Modules
When in the On-Site Editor mode, the editing sidebar will display to the left of your website.
Any detected module wrappers on the current page will be listed in the sidebar and clicking on a listed module name will scroll to that module’s content on the page so that you can easily and quickly access its edit buttons.
Clicking the listed module name’s 3 dot () contextual menu will display an option to publish any draft changes that have been made, along with a number of item’s, for that module, that will be published with this action.
WYSIWYG Properties
If you are using Text (Multiline) properties with WYSIWYG enabled, or you are using the system’s main Content property and these fields contain script, style or Liquid markup (ie: <script>, <style>, {{ }}, {% %} code), then the WYSIWYG editor will be disabled from the OSE Pro interface - disallowing editing of that field unless in code view.
If you need to allow WYSIWYG editing for such properties you can use the cms_ose_editable_text data attribute to wrap sections of text within the content region to isolate the problematic code and separate the editable text into multiple WYSIWYG editor blocks in the OSE Pro interface.
See the above Other Attributes section for more details on using this attribute.
The main 'Content' area of any item will always default to WYSIWYG mode and will not have Code View or plain multiline modes available via the OSE mode.
Editing, Drafts & Publishing
When in the On-Site Editor mode, any OSE configured module items should display their edit buttons.
Clicking the edit button will display all the item’s available properties (data fields) and allow you to make changes to their values, much like you would if in the admin area itself.
Upon any initial item’s change, you’ll have the option to save a draft. From that draft you can then choose to publish it directly in the current editing screen, discard the draft, or continue saving the draft.
Drafts do not need to be published at this time before moving on to other changes. The OSE will keep track of all draft versions and allow you to publish those either individually, as a batch per module, or all drafts across the site.
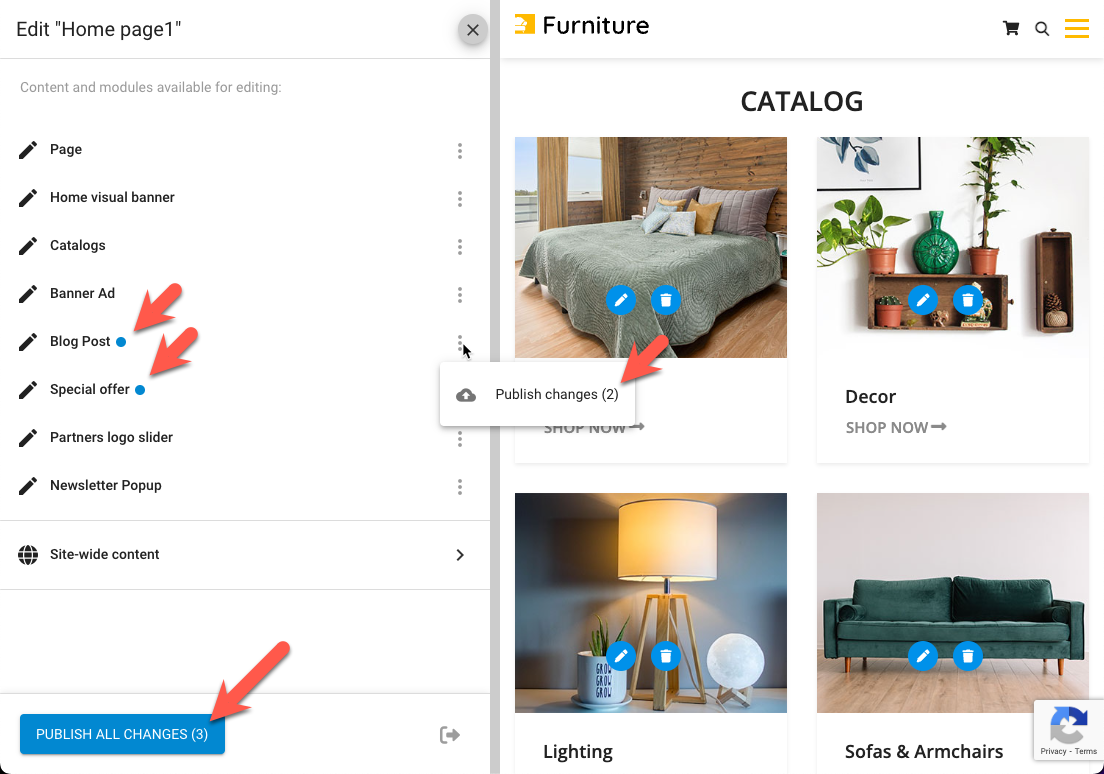
The OSE will actually detect and show a count for ALL draft files throughout the entire CMS, regardless of if those drafts are within modules configured for OSE or not. So be mindfull of publishing drafts in batches/bulk as this may inadvertently publish drafts that where not necessarily part of the admin user’s OSE session.
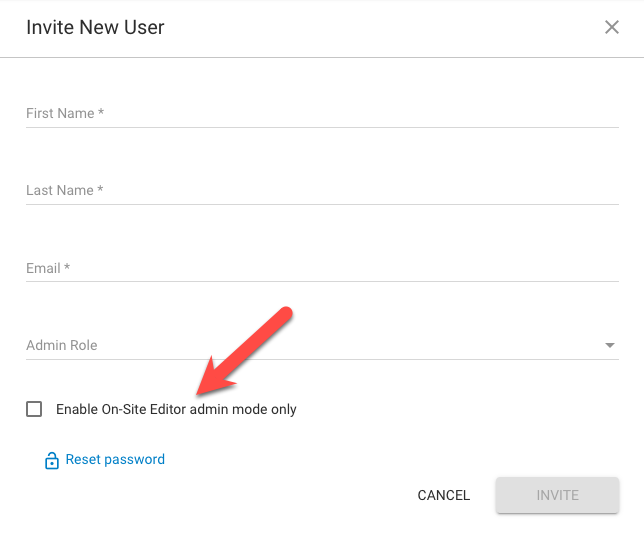
Admin Users
Admin users can be configured as OSE editors only, who will then only have access via the OSE and no access to the admin directly.
Admin User Roles can also be configured to allow or disallow certain admin users from editing items via OSE.
For example, to allow Site Global to be edited within an Admin User Role configuration:
Javascript Events
“After” Events
"After" events can be used to retrieve data that was returned from the server after a On-Site Editor Javascript event occurs, in order to apply any custom Javascript logic (for example, reinitiating a javascript/jQuery plugin).
Example usage:
document.addEventListener("CMS_OSE_AfterEditedContentChanged", function (event) {
    var data = event.data;
    console.log("Event data: ", data);
    //additional custom code here (eg: reinitiating a javascript/jQuery plugin)
});
All available "After" events and their returned data are listed below.
CMS_OSE_AfterEditedContentChanged
Fires after a draft has been saved or published for any edited item.
Returned data:
{
"itemId": 2290,
"moduleId": 2288
}
Re-Initialise
Re-initialising the OSE interface can be achieved with this event.
This is helpful in cases were your site loads in new items or content after the initial page load. For example; a “Load More” button on a blog listing page that pulls in additional blog posts. During the initial page load the OSE would not have detected those newly inserted blog posts and they would therefore not be editable via the OSE interface.
Triggering this event after a dynamic loading of content on your site will re-initialise the OSE and allow it to detect any new elements on the page that may require edit capabilities.
CMS_TriggerRefreshOSEItems
Example usage:
myLoadMoreFunction() {
    //load more items via AJAX.
    // when finished, reint OSE...
    let CMS_TriggerRefreshOSEItems = new Event('CMS_TriggerRefreshOSEItems');
    document.dispatchEvent(CMS_TriggerRefreshOSEItems);
};
Related Articles
- Site Settings & Management
Admin Users
Admin Users, found under ‘Settings’, is where you can control administrator access to your website management and content. - Site Settings & Management
Admin User Roles
Admin User Roles provide fine-grain control over permissions for users granted with admin access. - Site Settings & Management
Admin Menu Configurator
Customise the way admin users find and access site content and settings by configuring the admin menu with your own structure, labels, icons and links. - Treepl Portal
Two-Factor Authentication (2FA)
Treepl CMS provides the option of enabling Two-Factor Authentication for your Partner level access as well as for admin users on a per-site basis.
External Resources
There are currently no external resources available.
Please let us know if you have any other contributions or know of any helpful resources you'd like to see added here.
Questions?
We are always happy to help with any questions you may have.
Visit the Treepl Forum for community support and to search previously asked questions or send us a message at support@treepl.co and we will consult you as soon as possible.