Workflows
A Workflow is an action (or rule) that determines how a notification is handled. Workflows allow for greater control of email notifications that get sent when Forms are submitted on the front-end of your website. In this case we’re looking at Email Notifications.
Workflows consist of 3 main components. The ‘trigger’, which would be a form submission occurring on your website. The ‘action’, which is the workflow rule determining how the email notification will be sent and the ‘content’, which is the actual message delivered.
To help further visualise how all this comes together we can nest these components together as in the below diagram.
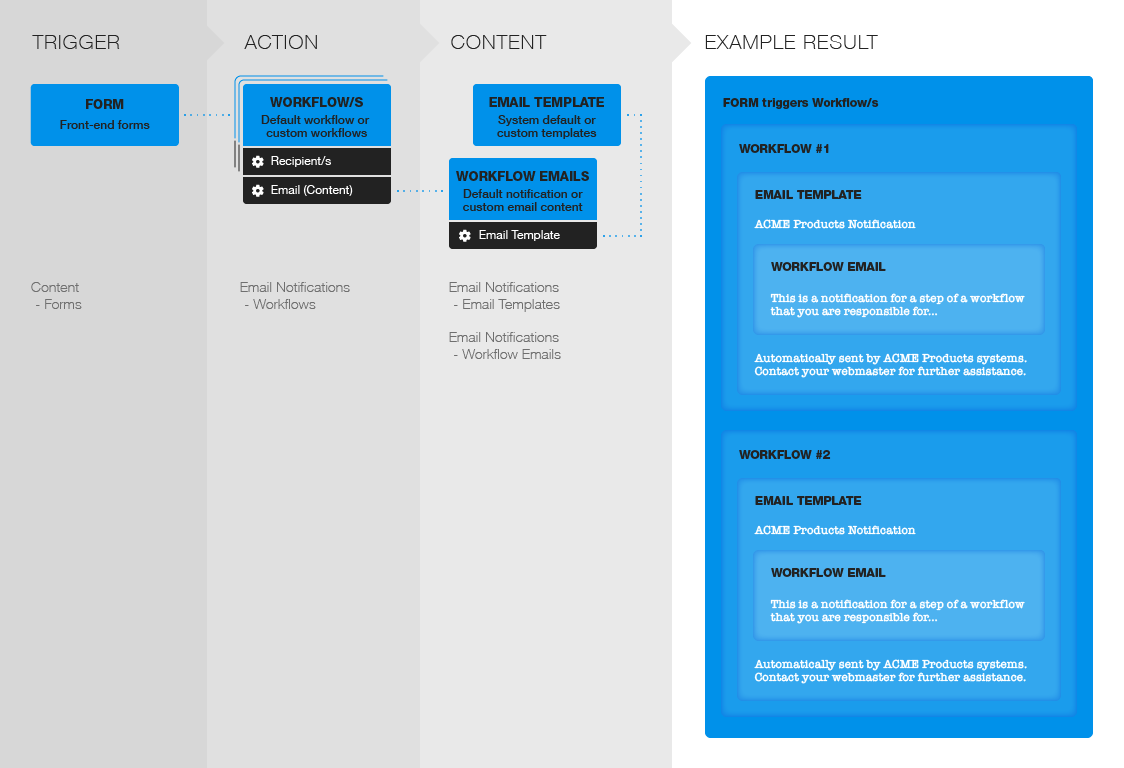
The outer layer is the form triggering the Workflow, which in turn governs the email content components to be used. Noting here that an email can consist of an overall template as well as the message body.
Furthermore, the trigger can activate multiple Workflows, in the case where various email notifications may need to be sent with different content and/or different recipients.
Let’s first look at the built-in ‘Inquiry Workflow’ available by default. This Workflow cannot be renamed or deleted as it’s the system default available to all website plans. You can add additional custom workflows if your website plan includes the Custom Workflow feature. You can assign a workflow to a form under the forms settings tab, found under ‘Content’ > ‘Forms’, choosing the desired form (or creating one), and navigating to the ‘Settings’ tab. Select the workflow from the ‘Workflow’ dropdown list and save the form. If no Workflow is selected the form will not trigger any notification and so no admin users will be notified. The ‘Email Notification’ section found here is for enabling an email autoresponder to be sent out to the users upon form submission. More on this can be found in the documentation around Forms. You can also customise the workflow recipient/s.
Under ‘Email Notifications’ > ‘Workflows’ you’ll find the workflows available and you can edit a chosen workflow’s settings. The built-in workflow has a preset name and the workflow email to be used, and from here you can add the email addresses of the recipients that are to be notified. Multiple recipients can be added. When on the edit page for a Workflow, you can use the duplicate icon (), next to the Workflow tilte at the top of the page, to make a copy of the current Workflow, including the recipients and assigned Workflow Email.
The preset workflow email is labeled ‘Workflow Notification’ and we can access this email, again under ‘Email Notifications’ > ‘System Emails’ and choosing the item called ‘Workflow Notification’. This is only for the built-in workflow email notification. If you create your own custom email notifications they will be found under ‘Email Notifications’ > ‘Workflow Emails’ (see Custom Workflows section below). The email notification can be assigned an email template, which can be further edited under ‘Email Notifications’ > ‘Email Templates’. As well as a “Subject” line, “From email” address and “From name” which would likely represent the staff member responsible for these notifications and to whom the recipient/s would likely reply to. Dynamic content can be added to the email body, rendering information from the form submission as well as inserting most other Liquid components and logic (suitable for email content). Similar to above, the built-in “System Default” email template can be edited or you can create your own custom templates. Again, with the ability to insert dynamic content related to the notification or other website data accessible via Liquid. Now, to look at setting up custom workflows. In this case, you’ll likely be creating all the various workflow components from scratch and bypassing the system built-in options. So I suggest working backwards (from the email template through to the form) to avoid stepping on your own toes, otherwise, you’ll need to assign items to items you’re working on that haven’t yet been created. So, starting at the email templates level, under ‘Email Notifications’ > ‘Email Templates’, we’d create a new template. You could duplicate the “System Template” as a starting point, using the ‘Duplicate’ action, or start from scratch with your own code. Once the template has been created and saved we can move on to the custom workflow email, under ‘Email Notifications’ > ‘Workflow Emails’. Set an appropriate name, assign the template we just created and configure the subject, and senders details. For the content, you can use the “Email Data” button to insert dynamic Liquid collections for further coding along with your custom HTML and message. You may even want to go back to the system notification email and copy it’s HTML and Liquid code as a starting point. After saving your email content, we can add a custom workflow rule to control when the email notification is sent. Under ‘Email Notifications’ > ‘Workflows’, click “Add New Workflow” and set an appropriate name for your workflow. Assign the workflow email we just created and then add the email addresses of any recipients who need to receive this notification and save the workflow. Finally, assign your custom workflow to a form (or create a new form) under ‘Content’ > ‘Forms’, choosing the desired form to work with and navigating to it’s ‘Settings’ tab where we can assign the Workflow. Save the form and your new custom workflow will now be triggered upon its submission. A form can be configured, via its ‘Settings’ tab, to trigger single, or multiple, predefined Workflows. However, there may be cases where you want to trigger a different Workflow/s based on conditions during the form's submission on the website. An example of this might be allowing the user to select which department an enquiry is to be sent to. Or perhaps the condition is dynamically set, without user input, based on other variables such as Liquid data or detecting a users selection of another input via Javascript. You can achieve this by adding an input to the form with You can find the Workflow ID by navigating to the appropriate Workflow in the Treepl CMS Admin and noting the trailing number in the URL. Insure your site plan supports multiple Workflows in order to utilise this method. In the first example, where the user can select the appropriate workflow, you could add a dropdown to the form with the following values: Or the second example, where the Workflow is set based on other conditions such as a Liquid variable, you could have a hidden input field like so: Or, if setting the Workflow ID with Javascript based on the selection made in another dropdown: You can even trigger multiple Workflows by changing the input type to a multi-selection style input, such as checkboxes: Or even with a comma separated list of Workflow ID’s in a text input. Triggering Workflows based on form inputs, with either a valid or invalid value for the Workflow ID, will override any Workflow settings configured in the forms ‘Settings’ tab, even if no Workflow is enabled there. An SPF record is a TXT record that defines which authorised parties can send email on behalf of (in the name of) your own domain name. There are various cases where Treepl CMS can send out emails in which you would want to appear as though they originated from you or your clients email address. Such as web form notifications, autoresponders, system messages, etc. So that Treepl CMS can do this in an authorised, non-spam risk way, it is strongly advised that you add the following 'SPF' record to any domain name's DNS that will be used with Treepl CMS. The 'SPF' record would have Use the SPF Generator to easily construct your SPF record, or to understand more about these values, or to manually construct your SPF record, see further details below. Instructions for manually creating, or updating, your SPF Record For any domain name added to a Treepl CMS website that will utilise system email messages, you'll need to add Example: If your DNS services doesn't list 'SPF' as a record type choose 'TXT' as the record type instead. Additionally, if you have Treepl hosted email (OpenSRS), your SPF record must also have So building on the example above we'd now have: It may be the case that you already have other 3rd parties sending emails on behalf of your domain and therefore already have an SPF record in place. In which case you'd need to add to this record and combine any existing entries with Treepl CMS values above. Below is an example including an existing domain name of a 3rd party service (Google) plus Treepl CMS includes for both system emails and hosted emails: For more information regarding SPF Record syntax refer to the official specification here. There are currently no external resources available. Please let us know if you have any other contributions or know of any helpful resources you'd like to see added here. We are always happy to help with any questions you may have.Built-In 'Inquiry Workflow'
Assigning a Workflow
Edit a Workflow
Duplicate a Workflow
Workflow Notification Email
Email Notification Template
Custom Workflows
Triggering Different Workflows
name="customWorkflows" and value="[WorkflowID]" where [WorkflowID] is to be replaced with your desired workflow’s ID.
eg: https://[YOURSITE]/admin/custom-workflow/2<select name="customWorkflows">
<option value="[WorkflowID]">Sales Enquiry</option>
<option value="[WorkflowID]">Technical Support</option>
</select>
<input type="hidden" name="customWorkflows" value="{{myWorkflowVariable}}">
<input type="hidden" name="customWorkflows" value="1">

<select name="enquiryType">
    <option value="">- Please select -</option>
    <option value="Sales Enquiry" data-workflowid="1">Sales Enquiry</option>
    <option value="Technical Support" data-workflowid="2">Technical Support</option>
</select>
<script>
    var workflow = document.querySelector('input[name="customWorkflows"]');
    var selector = document.querySelector('select[name="enquiryType"]');

    selector.addEventListener('change', changeWorkflow);

    function changeWorkflow(el) {
        var dataID = el.target.options[el.target.options.selectedIndex].getAttribute('data-workflowid');
        workflow.value = dataID;
    }
</script>
<input type="checkbox" name="customWorkflows" value="1">
<input type="checkbox" name="customWorkflows" value="2">
<input type="text" name="customWorkflows" value="1,2">
SPF Records
@ as the Host/Name field (or left blank, depending on how your DNS service prefers it).
include:_spf.trustedemail.co to your SPF Record, or create one if an SPF Record does not already exist.v=spf1 include:_spf.trustedemail.co ~allinclude:_hosted.trustedemail.co.v=spf1 include:_spf.trustedemail.co include:_hosted.trustedemail.co ~allv=spf1 include:_spf.trustedemail.co include:_hosted.trustedemail.co include:_spf.google.com ~all
And to check your SPF record syntax is valid you can use a service such this SPF Syntax Validator
Related Articles
Forms
Forms are an essential part of collecting user information on your website.
Treepl CMS makes managing forms easy and powerful
Emails
System email layouts can be managed here for additional Workflow Notification emails, Event registration follow-up emails and also eCommerce abandon cart emails (depending on your site plan and the extensions installed).
Email Templates
Email Templates provide a top-level wrapper for one or more of your system email’s contents, allowing for consistent branding and styling across emails sent via the CMS (such as Workflows, Autoresponders, reminders, follow-ups, abandon cart emails, etc.).
System Emails
System emails are emails that are sent when a particular action is carried out on the website and/or via the admin.
{{ member }} object
This liquid object will output the Member's details of whom submitted a Form.
You can...
{{ workflow }} object
This liquid object will output the Workflow details of a submitted Form.
You can use...
Email Notification Sender API
Trigger various system Email Notifications via the public API endpoint.External Resources
Questions?
Visit the Treepl Forum for community support and to search previously asked questions or send us a message at support@treepl.co and we will consult you as soon as possible.